

The Minor Pentatonic Scale
The diagram below shows the A minor pentatonic scale. “Penta” means five and there are five notes in the minor pentatonic scale. Most scales contain seven notes, but the minor pentatonic scale removes two of the most controversial notes. The result is a versatile scale that works in many different musical contexts. The circles on the diagram below show where to put your fingers on the fretboard. The numbers inside the circles indicate which fingers to use to press down on the strings. The red circles show the root notes of the scale. Every scale has a root note, which is the note the scale is named after and built from. In this case, the root note is A, because the scale starts on an A note. Memorize the root notes, because they are helpful reference points.
The A Minor Pentatonic Scale

Practice ascending the minor pentatonic scale by plucking each note with a downstroke ( ). The numbers to the left of each note written in standard notation indicate the fingering for the scale. Your first finger (index) plays notes on the fifth fret, your third finger (ring) plays notes on the seventh fret and your fourth finger (pinky) plays notes on the eighth fret.
Downstrokes - Ascending

Practice descending the minor pentatonic scale using downstrokes. Use the same fingering as the previous example when descending the scale.
Downstrokes - Descending

Practice ascending the minor pentatonic scale using alternate picking. Alternate picking is a guitar technique that uses alternating downstrokes ( ) and upstrokes ( ) continuously. Alternate picking works well on the minor pentatonic scale because there are two notes on each string. On each string, pluck the first note with a downstroke and the second note with an upstroke.
Alternate Picking - Ascending

Starting with a downstroke, descend the minor pentatonic scale using alternate picking.
Alternate Picking - Descending

Once you can play the minor pentatonic scale using alternate picking, use hammer-ons to ascend the scale. A hammer-on is performed by bringing a fretting-hand finger down forcefully onto the fretboard, causing a note to sound. Keep your first finger held down on the fifth fret each time you hammer-on. Right after each hammer-on, move your first finger to the fifth fret of the next string. Keep your first finger hovering relatively close to the fretboard as you transition. On each string, pluck the first note with a downstroke and hammer-on the second note.
Legato - Ascending

Descend the minor pentatonic scale using pull-offs. A pull-off is performed by pulling a fretting-hand finger off the fretboard, causing a note to sound. Make sure your first finger is fretting the fifth fret before and after each pull-off. On each string, pluck the first note with a downstroke and pull-off to the second note. It’s helpful to pull-off using a slightly downwards motion. When you do this, the finger you’re using to execute the pull-off essentially plucks the string, creating a louder, smoother sounding pull-off.
When you play using hammer-ons and pull-offs, you are using “legato” technique. “Legato” is an Italian word that directly translates to “tied-up.” When notes are played legato, they are played smoothly and without breaks between notes. Proper legato technique reduces strain on the picking hand, making it easier to play faster.
Legato - Descending

Lick 1 uses a blues curl, which is a type of string bend. The note being played is a C and it’s bent slightly sharp, but it’s not quite a C#. It’s somewhere between C and C#. While the blues curl is technically out of tune, it sounds great when used in the right context.
Place your thumb so that it hangs over the top of the neck, near the seventh fret. The joint that connects your first finger to your hand is placed on the bottom of the neck, near the fifth fret. For this lick, use more than one finger to help support the bend. Start by placing your third finger (ring) on the eighth fret of the high-e (string 1). Support the bend by placing your first (index) and second (middle) fingers on the high-e so that your index, middle, and ring fingers are touching each other. You will likely end up with multiple fingers on one fret, which is correct as long as the eighth fret on the high-e rings out properly. The blues curl is performed by rotating your wrist clockwise so that the pitch of the string raises slowly. Your thumb and knuckle of your first finger create a pivot point for your wrist to rotate. If you’re using the proper bending technique, you should feel most of the tension in your forearm rather than in your fingers. To play the blues curl, pluck the eighth fret on the high-e string and begin to bend the note so the pitch raises slowly. To stop the bend, place the palm of your picking hand on the strings near the bridge.
The squiggly line over the last note tells you to use vibrato. On guitar, vibrato is when you shake the string up and down using small motions to create a wavering effect. Give the last note some vibrato by shaking the string slowly with your first finger.
Lick 1 - A Minor Pentatonic

Lick 2 uses the same notes as lick one, but it is transposed one octave lower. The last example used fingers one (index) and two (middle) to support the bend. In this example, the bend is executed with your first finger (index), which means you can’t support it with other fingers. Place your first finger (index) on the fifth fret of the G-string (string 3). Place your thumb so that it hangs over the top of the neck. For this example, it’s also acceptable to place your thumb in the center of the back of the neck if you find that more comfortable. Pluck the string and begin to bend the note upwards so that the pitch raises slowly. To stop the bend, use the palm of your picking hand to mute the strings. Play the last note by placing your third finger (ring) on the seventh fret of the D-string (string 4). Use the vibrato technique to shake the string slowly. This time, support the vibrato by placing your first (index) second (middle) fingers on the D-string (string 4) so that your index, middle, and ring fingers are touching each other. Like the previous example, you will likely end up with multiple fingers on one fret. This is okay as long as the seventh fret on the D-string (string 4) rings out clearly.
Lick 2 - A Minor Pentatonic

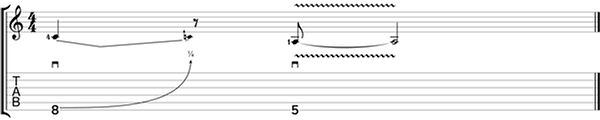
Lick 3 is the same as the previous lick, but it has been transposed another octave lower. Place your fourth finger (pinky) on the eighth fret of the low-E (string 6). To execute the bend, use your fourth finger (pinky) to pull down the eighth fret of the low-E. To stop the bend, use the palm of your picking hand to mute the strings. Play the second note by placing your first finger (index) on the fifth fret of the low-E. Give this note some vibrato by shaking the string slowly with your first finger.
Lick 3 - A Minor Pentatonic
FILL OUT THE FORM BELOW TO GET YOUR FREE PDFS!
I promise not to spam you.
You will receive an email with over 20 pages of free downloadable PDFs.
By signing up for my mailing list, you agree to receive email updates for future lessons.